Urban Garlic: The Pot Method for Home Cooks
Garlic is one of those magical ingredients that can transform even the simplest dish into a flavor masterpiece. The good news is that you don’t need a sprawling garden to grow your own supply. With the pot method, urban dwellers can cultivate fresh garlic right from their balcony, windowsill, or patio. This approach is perfect for small-scale gardening and offers flavorful bulbs with minimal effort.
Curious about how to get started? Here’s a step-by-step guide to growing garlic in pots, perfectly tailored for home cooks and city gardeners alike!
Why Grow Garlic in Pots?
Growing garlic in containers allows you greater control over soil quality, drainage, and pest management—especially important in urban areas where garden space is limited. Garlic is remarkably adaptable and doesn’t require much room to thrive—just a deep pot, a sunny spot, and a bit of patience.
Container gardening is also an excellent entry point for novice gardeners. Watching your garlic shoots sprout and eventually produce aromatic bulbs adds a rewarding touch to your culinary adventures.
Choosing the Right Garlic
There are primarily two types of garlic you can grow:
- Softneck garlic: This type is commonly found in grocery stores, thrives in warmer climates, and stores well for longer durations.
- Hardneck garlic: More suited for colder climates, this variety boasts a bolder flavor but has a shorter shelf life.
For the best results, be sure to purchase organic garlic bulbs from a nursery or gardening center; supermarket garlic often contains growth inhibitors. Just before planting, gently break apart the garlic bulb into individual cloves, keeping the papery skins intact for better growth.
The Best Pot for Garlic
Selecting the right pot is crucial for successful garlic growth. Here are some essential tips:
- Depth: A pot should be at least 8–10 inches deep.
- Width: A 12-inch wide container can comfortably hold 6–8 cloves.
- Material: Choose from plastic, clay, ceramic, or even recycled containers, as long as they have adequate drainage holes.
Make sure the pot has multiple drainage holes at the bottom to prevent root rot—if necessary, drill extra holes.
Soil Preparation
Garlic flourishes in loose, nutrient-rich soil with good drainage. For an ideal potting mix, combine:
- 2 parts potting soil
- 1 part compost or well-rotted manure
- A handful of sand or perlite for improved drainage
Garlic prefers slightly acidic to neutral soil (pH 6.0–7.0). Steer clear of heavy, compacted mixes that retain too much water. Prior to planting, you can incorporate a slow-release organic fertilizer or bone meal to provide an initial nutrient boost.
Planting Garlic Cloves
The best time to plant your garlic is in the fall, typically between October and November, or late winter to early spring in milder regions.
Follow these simple steps:
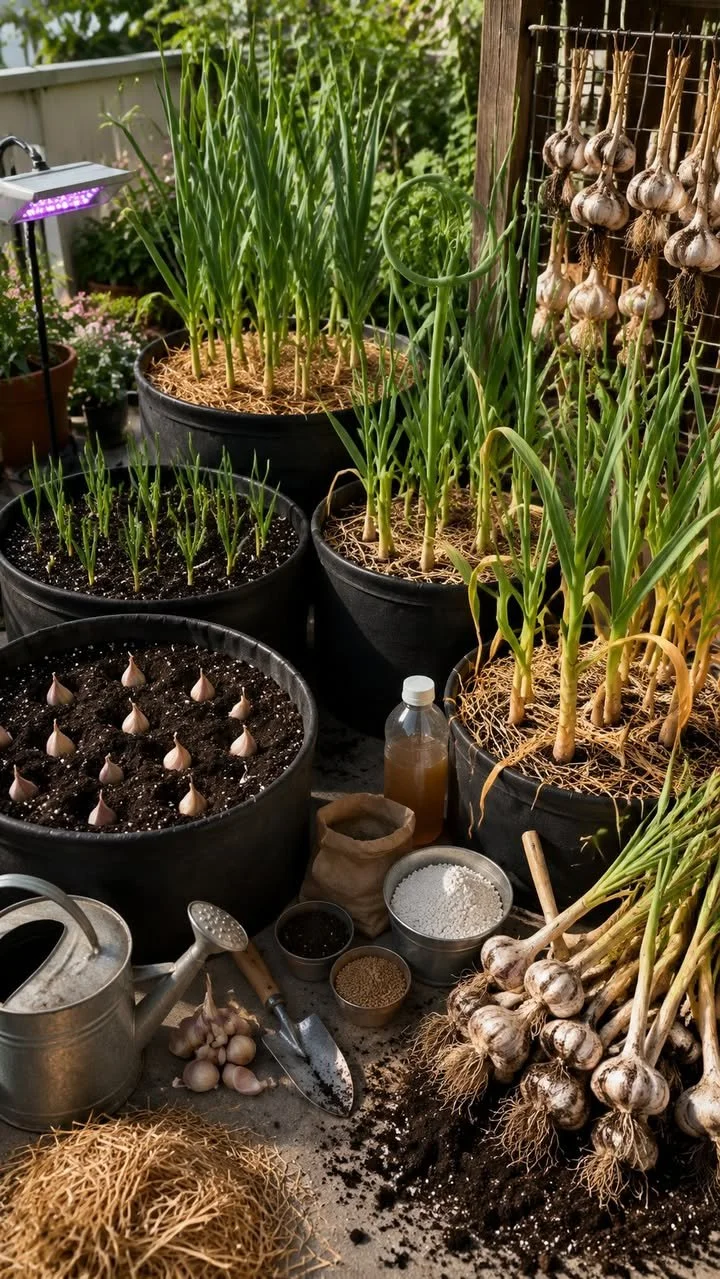
- Fill your chosen pot with prepared soil, leaving about 1 inch of space at the top.
- Plant each clove 2 inches deep with the pointed end facing upward.
- Ensure cloves are spaced 4 inches apart for adequate bulb development.
- Cover with soil and gently pat the surface to secure it.
- Water thoroughly, ensuring the soil is moist but not soaked.
Sunlight and Watering
Garlic requires full sun, so position your pot where it receives at least 6 hours of direct sunlight daily. For indoor gardening, a south-facing windowsill works well, or you may use a grow light as a supplement.
Maintain even moisture in the soil—water when the top inch feels dry. Be cautious, as overwatering can lead to root rot. In colder climates, consider protecting outdoor pots with mulch or relocating them to a sheltered area during freezing conditions.
Caring for Potted Garlic
Maintain your potted garlic with these additional care tips:
- Mulching: Apply straw or dried leaves on the soil’s surface to retain moisture and reduce weed growth.
- Fertilizing: Feed monthly with a diluted liquid fertilizer, especially during Spring as bulbs start forming.
- Weeding: Regularly check for weeds or competing shoots, which could hinder your garlic’s size.
In late spring, you’ll notice green shoots known as “scapes” on hardneck varieties. These delicious curly stems can be harvested while young and used in cooking!
Harvesting Garlic
Garlic typically takes 7–9 months to mature. You’ll know it’s ready for harvest when the lower leaves turn yellow and dry out, while the upper leaves remain green.
To harvest:
- Cease watering a week before you intend to harvest to help the bulbs firm up.
- Carefully loosen the soil and pull the garlic bulbs from their base.
- Cure the harvested garlic in a dry, shaded area with good airflow for 2–3 weeks.
- Once cured, trim the roots and stalks and store in a cool, dry place.
Properly cured garlic can last several months and offers a flavor far superior to its store-bought counterparts.
Final Tips
If you plan to reuse the same pot, remember to rotate your crops to reduce the risk of disease. While waiting for your bulbs to mature, use garlic greens in salads, stir-fries, and soups for an extra burst of flavor. Don’t forget to label your containers if you decide to plant multiple varieties.
Growing garlic in pots is a fantastic solution for urban gardeners seeking fresh ingredients without requiring extensive gardening space. With a bit of sunlight, the right container, and some straightforward care, you’ll soon be harvesting aromatic, homegrown garlic that can elevate any dish in your kitchen!